Importing your list
Drag & Drop: Drag and drop your list anywhere inside the dotted lines to get started. (The application workspace will highlight blue when you are able to drop your list.)

Direct Upload: This will launch the file picker, giving you various import options such as uploading from a desktop folder, FTP, a specific URL, or Cloud Storage such as Google Drive, box.com, or Dropbox. There's even another drag & drop window here because we just like being redundant being redundant.
Import From: This allows you to import directly from a marketing platform such as CampaignMonitor, Constant Contact, SendGrid or MailChimp. This feature requires an account with one of these platforms and an existing email list on that account. Depending on the platform used, you will need to either enter your login or API Key to access your lists.

Once the list is imported, it is scanned to determine the number of records to verify. This is a short process that can take longer depending on the amount of records in your list.
Once the list has finished preparation, you will be shown the total amount of records and verifications, and what the final cost will be. Click the "Begin Verification" button to begin.
IMPORTANT: You will be billed as soon as you click "Begin Verification"


You can also choose to cancel the verification by clicking on the "X" in the upper right corner of the card on the confirmation screen. You will not be billed for this, as there have been no verifications. This will delete your list and will need to be re-imported in order to proceed.

Below are a list of common import errors and how to deal with them:
Illegal Quote: This is the most common error and means that your list has been formatted improperly. This can be fixed by importing your list into Excel and re-saving it as a CSV.
Over 1mm Rows: You can either split your full list into a series of smaller lists, or contact MightyVerify and we will verify this for you. If you do split into smaller list, we recommend doing them one at a time to prevent system slowdown.
Email Column Undetermined: We could not find any emails in your list. Either the list contained no emails, or the formatting was incorrect.
List Verification
After verification has been authorized, your list will begin loading and then the verification process will begin. Loading time is dependent on the size of your list.


As the list is being verified you will be able to see real-time results in the donut chart in the center, while your progress is indicated by the bar on the bottom and the percentage in the center. Below is a guide for determining what the colors represent. For a more detailed description of the various statuses, please see our status key.
Red: Invalid Emails
Green: Valid Emails
Dark Grey: Unknown
Light Grey: Accept All

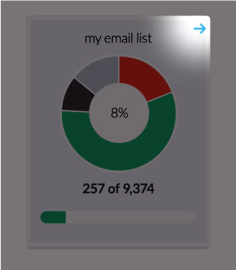
Once verification is complete, you can download just the valid emails by clicking the "Download Valid" button, or view your full results by clicking the arrow on the upper right of the card.
Verification Completed
Your list details can be seen by clicking the arrow link at the upper right side of the completed card. The list details screen will show you the total number of emails for each status, the final cost of the verification, and give you the option to download, export, or delete your list.

NOTE: A blue "info" icon denotes that additional information is available by moving your mouse on top of it.
After the verification process is complete, you can download the verified list by clicking the "Get Valid Emails" button on the front of the card. This will download only the valid emails from your verified list. You can download all emails (including invalid, accept all, and unknown) in the List Details window.
UNDERSTANDING YOUR RESULTS
When your list is complete and you open the downloaded CSV, you will see something similar to the image below. Each row will show the individual email that was verified, and then the primary and secondary status results of the email.

For best results, we strongly recommend mailing only to "Valid" email addresses. Some ESPs allow emails to be sent to "Accept All" statuses, but this is not always advised.
THE ADDITIONAL FEATURES
These additional download features can be found in the list details screen.

- INVALID ONLY
This will download only the invalid records in your list. This is recommended for people looking to remove these results from their list manually.
- VALID ONLY
This will download only the verified emails that are considered safe to send. This is recommended if you are using an Email Service Provider (ESP) to send out your email campaigns.
- FULL RESULTS
This will download all the records in your list, including invalid, accept all, and unknown. If you are downloading your verified list to upload to an ESP such as MailChimp, we recommend either the "Download Valid" button on the front of card, or the "Safe To Send" option to download only the verified addresses.

You can delete your list by clicking the button on the upper right side of the File Details screen.
Important: Once a list is deleted you are no longer able to view or download the results unless that list is re-verified. Do not delete your list unless you are absolutely sure you do not need it anymore.