MightyForms Setup Guide
These are the basic steps that will be covered to set up MightyForms. Additional customization options are available at the end of this document.
In order for MightyForms to work in production environments, you need to specify which domains are authorized to run MightyVerify scripts. This is done at the account level, so that you only have to authorize a domain once and it will work for all your forms.

To add a trusted domain, go to Forms and click on Trusted Domains. From there enter the url of the domain you want to authorize. For example, if you wished to authorize app.mysite.com, you would enter https://app.mysite.com. Please note that you will need to authorize the exact domain as we do not support wildcards at this time. For example, if you want the script to run on both mysite.com and www.mysite.com you will have to add both of those domains.

Next you need to create your first MightyForm.
Next you need to create your first MightyForm.
Click "Install Form."
Enter a name for the new form.
Click "Create Form."
You should now be viewing the Form Settings for your new form.
Paste the JavaScript code snippet generated for you from the form settings into your webpage just before the close of the tag. The snippet includes your public MightyForm key, which does not need to be hidden.
The snippet should look like this:
<!-- Put this just before the closing body tag -->
<script type='text/javascript'>
<script>
window.mightyFormSettings = { formKey: 'your-public-mightyform-key' };
</script>
<script src='//cdn.mightyverify.com/bforms.js' type='text/javascript'>
This will work on the first form on the page provided that the form contains an field with a type equal to email.

Important note: By default your form is set to test mode. You will ONLY be able to test the following addresses:
valid@mightyforms.com: This will simulate a valid verification.
invalid@mightyforms.com: This will simulate an invalid verification.
unknown@mightyforms.com: This will simulate an unknown verification.
acceptall@mightyforms.com: This will simulate an accept_all verification.
fraud@mightyforms.com: This will simulate a submission suspected of being fraudulent.
For many users, client-side verification is enough. But client-side verification can still be bypassed by a determined attacker. If you want to ensure that fraud is not occurring on your forms you need to install the second line of defense confirming each form submission using our Token Certification API on the server side.
Each MightyForm that is submitted to your server includes a hidden field calledmightyform_token. You can pass this token plus the email submitted with the form to our REST API endpoint in order to ensure the submission is indeed valid and originated from an actual browser session. You must authenticate the request by passing along yourprivate key. You should keep your private key secret; contact support if you think it may have been compromised. Your private key is listed in the text above the code snippet in the MightyForms screen.


When you are ready to promote your form to production click on your form and move the slider from "Test" to "Live."
The test email addresses from Test Mode will no longer validate as before (they are for test mode only). Confirmation Dialogs and associated confirmation emails will only be prompted by transactions that MightyVerify deems 'suspicious.' Otherwise, valid emails will be permitted through the form, and invalid emails will be blocked from submitting the form.
The contents of MightyForms confirmation emails are fixed and cannot be customized at this time.
Alternate Setup Options
If MightyForms isn't automatically activating on your page or it isn't activating on the correct field, then you can use one of these alternative methods below. Either one will work, use whichever you prefer. These methods will allow you to manually specify which form and which field should be verified by MightyForms.
Alternatively, you may specify your public MightyForm key and the email field inline within the form using data-* attributes.
This can be useful if we can't find your email field automatically, or if the form you want to verify isn't the first one on the page.
form data-mightyform-key='your-public-mightyform-key
input type='text' data-mightyfield='email'>

Additionally, you may specify the public MightyForm key and the email field using Javascript. This can be useful if you aren't allowed to modify the attributes of the form on your page, but can insert additional JavaScript.

Custom API
We allow you to add new functionality and customize nearly every aspect of the MightyForms experience via our api.
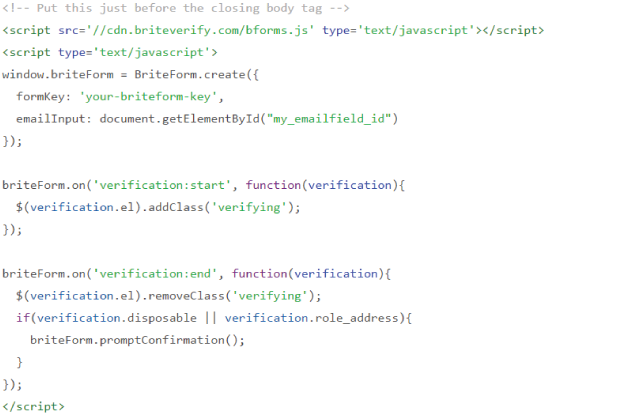
You can hook into MightyForm verification events to add additional functionality.
verification:start
verification:end
Each event passes a verification object into the callback function.

The el object will be the email field to which the verification is attached.
In this example we show how to force confirmation on role and disposable emails using the event api. You will instantiate the script. You will not use window.mightyFormSettings, but instead create an instance of the MightyForm class yourself directly.
You can run MightyForms in manual mode which will turn off the automatic verification widget on the email field and allow you to customize your own look and feel, while still maintaining all the advantages of MightyForms. To do so you simply specify manual mode and then hook into the verification:start and verification:end events to code your own behavior.

By default MightyForms adds a hidden field with the MightyForm token for server side certification of the form data. To prevent the hidden field from being added to the form automatically, pass the addToken: false option and the hidden field will not be added. You can obtain the mightyForm token by making a call to the mightyForm object to obtain it.

By default MightyForms adds a hidden field with the MightyForm token for server side certification of the form data. To prevent the hidden field from being added to the form automatically, pass the addToken: false option and the hidden field will not be added. You can obtain the mightyForm token by making a call to the mightyForm object to obtain it.
