Integrating MightyForms with Pardot
Create a MightyVerify account by visiting https://app.mightyverify.com/users/sign_up
Once your account has been created, you will need to upgrade to MightyForms. This can be done by either logging into MightyVerify and either clicking the "Upgrade to MightyForms" button, or by going to "Account Settings" and choosing "Plans"


Once your account is created, click the ‘Forms’ tab and click on the ‘Trusted Domains’ button.

Add the root URL for your Pardot pages. You can find your URL by looking at an existing Landing Page in Pardot, or by creating a new one and looking at the first part of the "Vanity URL"
Note: You will only need to put in the first part, this is the domain. Do not include anything after ".com"


Next click the ‘+ New Form’ button, name your form, and click ‘Create Form.’ Copy the code snippet as you will paste it in Step 6.


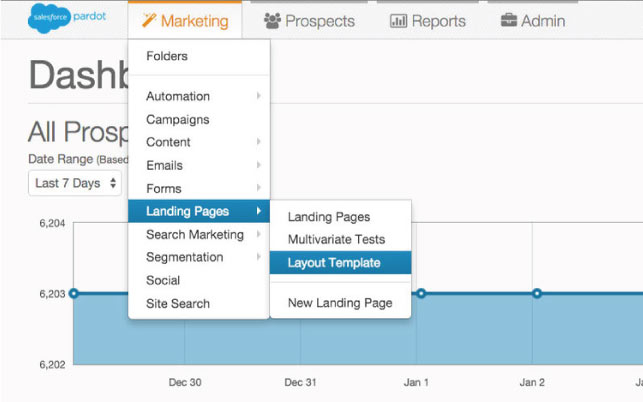
Log into Pardot and create a new Landing Page template. You can find the landing page templates under Marketing > Landing Pages > Layout Templates.
If you already have a template made, select it from the list and click "Edit Layout Template". If you have not yet created a template, click the "Add Layout Template" button on the upper right side of the screen.
It is also worth mentioning here that if you have not created a form for your landing page you will need to do so first. This can be found in Marketing>Forms>New Form.


After entering the Template Layout Editor, you will see an area where you can paste your code.

We will need to use a custom version of the code here to allow MightyForms to recognize your input fields.
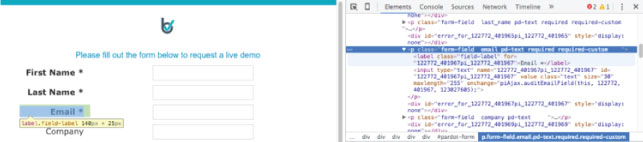
In a separate browser window open your Pardot email form, hover over the "Email" field and right click to select "Inspect Element". (This is for the Google Chrome browser, for other browsers, please refer to their documentation on how to inspect an elements source code)

What we are looking for here is the string of numbers underneath the words "Label Class" for the email field. This is your element ID. In the example we are using it is 122772_401967pi_122772_401967

Next, we will need to add a little code to have MightyForms recognize the email field in your form. Simply add this line of code directly underneath the line

Replace the text: YOUR FORM ID with the form ID you just copied. Your script should now look like this:

Paste the code snippet from step 6 into the script editor window. You will be placing this right before the closing </body> tag.
Click the "Create Layout Template" button under the script window. If you are editing an existing template, this will say "Save Layout Template"


Now that your template is set up, you will need to create a landing page and assign the template that you have created.
Go to Marketing > Landing Pages > Landing Pages and click the "Add Landing Page" button on the upper right side of the page to create a new landing page.


Next, you will need to link the template we just created to your new landing page. After following steps 1 & 2 (Naming your page and selecting your form) in the Landing Page Wizard, you'll be asked to select the Page Template. Select the template we just created and click "Confirm and Save"

Next, you will need to link the template we just created to your new landing page. After following steps 1 & 2 (Naming your page and selecting your form) in the Landing Page Wizard, you'll be asked to select the Page Template. Select the template we just created and click "Confirm and Save"
If you already have a landing page made and want to assign your new template to it, you will need to edit the landing page and select the proper template.
After you finish the steps to create your landing page, it's time to test it out. Click the "View Online" link.

Important note: By default your MightyForm is set to test mode. You will ONLY be able to test the following addresses:
valid@mightyforms.com: This will simulate a valid verification.
invalid@mightyforms.com: This will simulate an invalid verification.
unknown@mightyforms.com: This will simulate an unknown verification.
acceptall@mightyforms.com: This will simulate an accept_all verification.
fraud@mightyforms.com: This will simulate a submission suspected of being fraudulent.
You must take your form out of test mode in order to validate anything other than the addresses shown above. You will do this in Step 11.

Back to MightyForms, click on the ‘Forms’ tab then on the MightyForm you just created to view all your test analytics.

This screen will provide valuable information about your form health once your form is turned live.

When your form is ready to be turned live visit the MightyForms Form tab, click on your MightyForm and move the toggle switch at the top of your analytics page from Test to Live.

NOTE: All analytics observed during test mode will be reset to 0 when you turn your form live.